FUIX Addon to transform social media UI

FUIX  – A browser extension to update and transform social media UI (eg: Facebook, Messenger, Instagram). 

Browser Specs

View on

v92.0 or

Firefox Browser logo

v92.0 or

Edge_Logo_265x265

v79 or

v92.0

🟢 The addon is now available for Firefox, Edge, Opera (Dev & Next)

Demo(s)

Preference (Light)

Preference (Dark)

Facebook ▼

Messenger ▼

Instagram ▼

Installation and access

Click on the Add to Chrome (or your preffered browser) link from the above table. After installing the addon you can pin it to your borwser in order to access and save preferences instantly.

Then click on the FUIX Logo icon from the borwser toolbar or click from the Extension dropdown (if you didn’t pinned it)

Create a new slot

  1. Facebook 
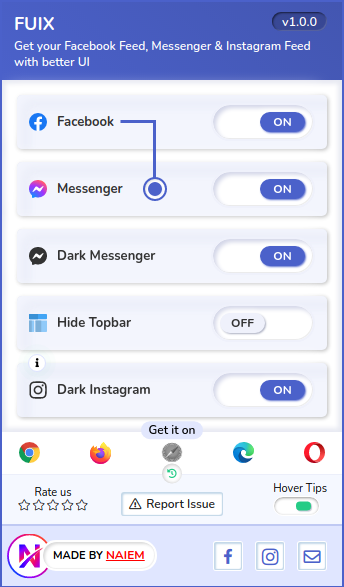
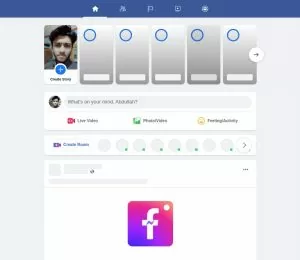
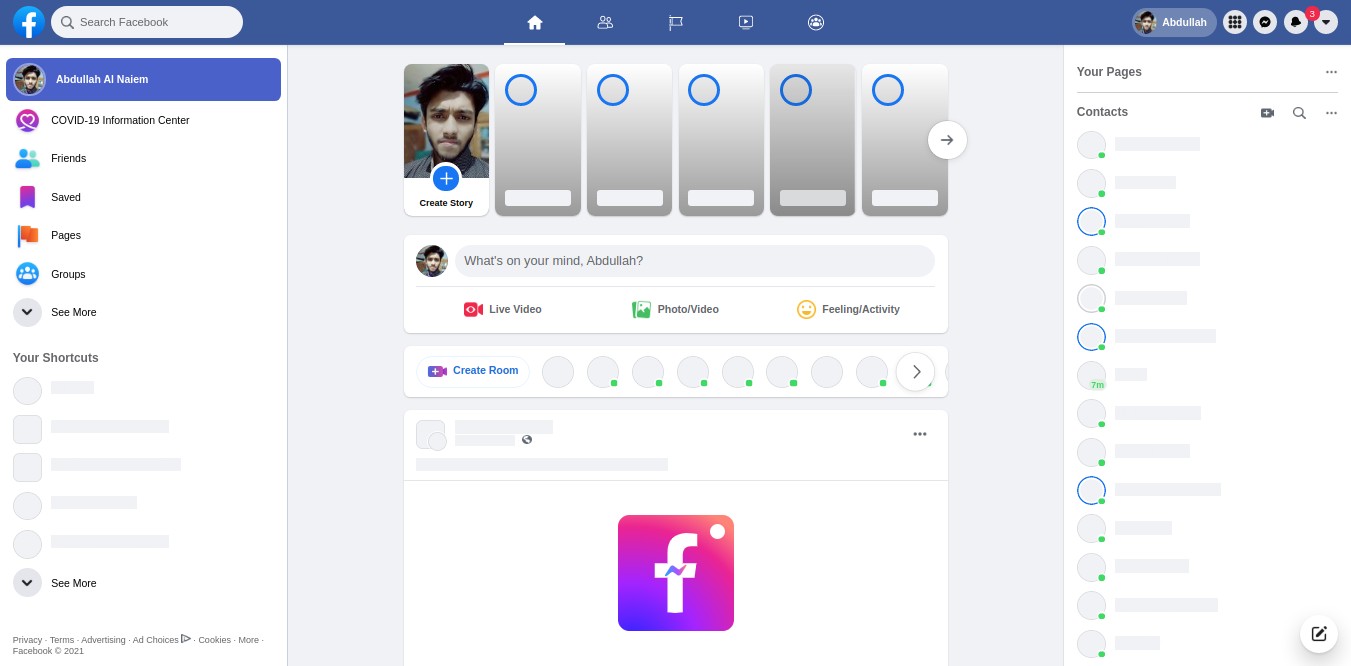
Facebook: Turn it on Toggle on If you want to apply UI like Demo 1 & 2. The design will be applied to Facebook Light and Dark – both modes.
  2. Messenger Messenger: Turn it on Toggle on  If you want to apply UI like Demo 3 & 4. The design will be applied to Mesenger Light and Dark – both modes. Dark messenger will work when it’s enabled. To do that, follow the next step. There’s also another option (button) inside the Messenger box. Fb to m.me Enable it, if you want to apply some facebook styles to the messenger (specially selected item/row or selected chat) like the below image the selected row will be hightlighted on Light and Dark – both modes.
    Messenger Conversation Light Messenger Conversation Dark
  3.  Dark Messenger: Turn it on Toggle on If you want to switch Messenger Light to Dark mode also apply UI like Demo 4. This option will work only at messenger.com or any URL that prefix started with messenger.com. There’s also another way to use Messenger. If you want to use Dark Messenger also at facebook.com/messages then you must enable dark mode from the facebook topbar Display & Accessibility Icon Display & Accessibility section. Display & Accessibility
  4. Facebook Topbar Hide Topbar: Turn it on Toggle on If you wish to use Messenger also at facebook.com/messages. But don’t want to see the top bar Hide Topbar This option will work only at facebook.com/messages or any URL that prefix started with facebook.com/messages.
  5.  Dark Instagram: Turn it on Toggle on If you want to switch Instagram Light to Dark Mode. See the Demo 5.

Terms

  1. The styles will be load from the Github repo. So make sure your internet connection is active to see the design.
  2. UI update and changes will be made on the Github repo and it will be loaded automatically on your Facebook, Messenger, and Instagram feed through the FUIX addon.
  3. There’s no need to Update the addon to get the UI updates.
  4. Addon can be updated when an internal update or new feature comes up or any bug is fixed.

Important Notes

  1. You can always save your preferences in FUIX. Internet connection isn’t required to change the preference. Only required if you want to see the styles in your feeds.
  2. After making changes on FUIX it may take 1-3 seconds to load the styles on your Facebook, Messenger, and Instagram feed. The styles loading delay also depends on your internet speed.
  3. If your Facebook, Messenger, or Instagram feed is opened in your browser and the internet connection isn’t active. At that time if you turned off any option that style will be gone if activate that again the styles won’t load until the internet connection is active or reload the page.
  4. You don’t need to worry if you don’t see any changes. There will appear a popup alert what happened.
  5. If something happens wrong with the FUIX addon or you notice any issue just click on the “Report Issue” button from the FUIX addon footer.

Privacy

This addon only append styles from the Github repo to your feeds as per the saved preference. It doesn’t collect any personal data, credentials or any sensitive information from your browser. You can use it safely.

Contact

E-mail: [email protected] (for any inquiries)

For any suggestion or UI Update contact or comment down below.

Abdullah Al Naiem

Abdullah Al Naiem

Web application developer. Loves IT, Programming, and being connected with tech.

Share this article

Facebook
Twitter
LinkedIn
Pinterest
Skype
Telegram
Reddit
WhatsApp
Email
Print

Tags

Author Info

Abdullah Al Naiem

Abdullah Al Naiem

Web application developer. Loves IT, Programming, and being connected with tech.

Popular Articles

Get a Quote

Why Direct Contracts?

How it works

Direct Contracts allow you to work with freelancers on Upwork when you don’t have an Upwork account.

With escrow service, your funds are protected and won’t be released until the work has been completed. This gives your freelancer assurance that the project funds are available, and they can be certain of your payment upon the successful completion of the job. You also have the ability to cancel the contract at any point before you approve the release of funds. If you cancel, the funds are returned to your original payment method within seven business days.

All Direct Contracts will be managed by email. We’ll provide you with simple, easy-to-follow instructions every step of the way. We’ll also send you invoices with all the relevant contract details, including the contract name, description, price, your company name, and the freelancer’s name.

Freelancers with Upwork accounts can create and send both hourly and fixed-price contract proposals to their clients that aren’t registered on Upwork.

Review and accept a Direct Contract

Once a freelancer has sent you a Direct Contract offer, you’ll receive an email from Upwork detailing the freelancer’s proposal. You will receive all the key information, including the contract amount, title, and description. You will have the option to either “Accept and Fund Contract” or “Decline.”

Fund a Direct Contract

After you have agreed to the terms of the contract, you’ll be asked to deposit the funds for the contract in escrow via a credit card or PayPal. For an hourly contract, you’ll be asked for a one-time deposit for the equivalent of one week’s worth of contracted work, plus a small payment processing fee, if applicable.

Once you have deposited funds, the contract starts and your freelancer can begin the project. All transactions will take place in USD.

If you have a fixed-price contract, your freelancer may choose to add milestones to divide the job into a series of phases, due dates, or deliverables based on your needs. Milestones are individually funded, and provide a way to work through a large project in smaller steps.

If your contract has milestones, you will only need to fund one milestone at a time. For example, if the contract has five milestones at $100 for each milestone, the contract total is $500. However, you’ll only need to fund Milestone 1 with $100 (plus any payment processing fees) to get started. Once that milestone is complete, you can choose to fund and activate the next one. 

Fixed-price Contracts

Once the freelancer has completed and submitted work for the project, they will send you a request for payment. You’ll receive an email notification with the option to “Accept” or “Decline” the request.

If you accept the request, the funds are immediately released to the freelancer and the contract is closed.

If you reject the request, the funds remain in escrow and the contract is kept open, the freelancer can then make any necessary changes to the work and resubmit their payment request.

Hourly Contracts

Once the freelancer has logged hours, you will have the opportunity to review them. You’ll see what was logged in the previous week, and what is being logged in the current week. The hours will be charged automatically unless you take action.

If a freelancer logs extra hours outside of the limit on your contract, you’ll be able to approve or decline them. If you do not approve the extra hours, they will not be charged.

Note: When your freelancer submits a payment request you have 14 days to review. If you do not take action, that is considered approval and funds will be automatically released to the freelancer.

Direct Contract rights reserved by Upwork Global Inc.