Google Meet Auto Join Pro – Browser Addon

Google Meet Auto Join Pro  – A browser extension to join Google Meet conference / class / meeting automatically with scheduled time.

Browser Specs

View on

v92.0 or

Firefox Browser logo

v92.0 or

Edge_Logo_265x265

v79 or

v92.0

🟠 The addon is now under moderation. Will be release soon to all above browser web store.

Installation and access

Click on the 
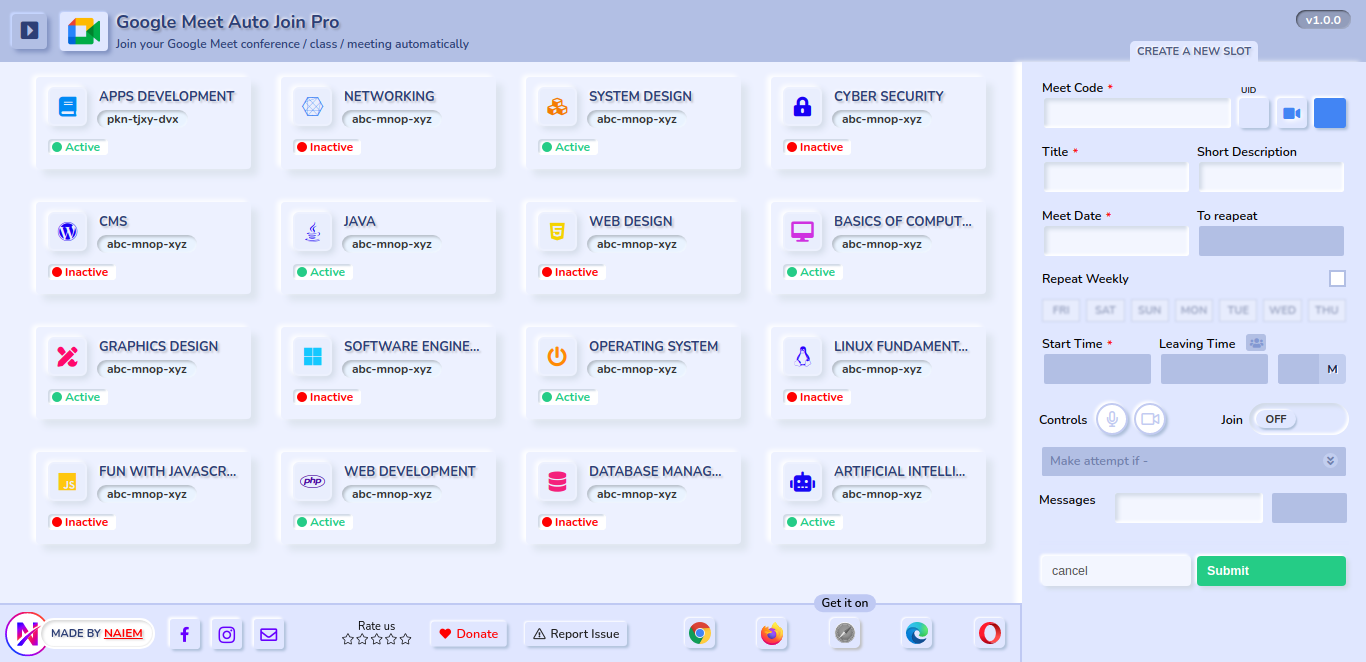
Add to Chrome (or your preffered browser) link from the above table. After installing the addon you can pin it to your borwser in order to access and save preferences instantly. Then click on the > Google Meet Auto Join Pro Logo icon from the borwser toolbar or right click on the options 3 dots icon that associated with Google Meet Auto Join Pro Logo > click options to access the options page and other features.
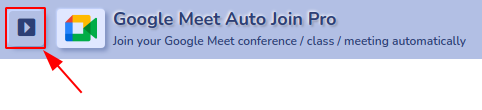
Settings

  1. Hide Tips: On the Create a new slot form, you can see the tips with a  icon above of the every field when mouse is hovered. You can enable and disable the tips feature from this setting.

  2. Preference Mode: From the options page click on the arrow icon from the top left corener. From this option you can change display preference Light, Dark, or System Auto.

Create a new slot

  1. Meet Code*Enter your Google Meet Code.
  2. UID: If you have logged into multiple Google account. Then you can select your target Google Account to join your Google Meet. Normally the default user UID is zero (0). Here’s the example of UID
  3. Icon: Select a relevant icon according to your meet to identify the slot.
  4. Color: Select your preferred icon color for the slot.
  5. Title*Enter your Google Meet class / conference or meeting name as title.
  6. Short Description: Enter a description for your Google Meet slot. It’s not necessary.
  7. Meet Date*: Enter the meeting date that you want to join.
  8. Repeat Date Enter the repeat date. Automatic join will be continue to till this date everyday.
  9. Repeat Weekly: Check it from the right side, if you want to repeat automatic join weekly or based on the day(s). [Note: If you enable this option, the date option will be disabled]
  10. Start Time*: Select your meeting time
  11. Leaving Time*: Select the leaving time, if you wish to leave automatically in your preferred time. Or you can enter the leaving time difference value (as minutes) manually that labeled with “M”.
    You can also set leaving time/moment from  if meeting has certain number of recipients.
    [Note: If your joined meet manually closed by you or the host, then automatic leave won’t take any action.]
  12. Controls:
    •  Turn on/off your meeting camera & microphone
    • Join: The automatic join and execution will be happen if it’s enabled or turned ON
  13. Make attempt if -:
    • Internet Disconnected: Enable it if you think your internet connection may lost on the joining time.
      The default try will be happened on the selected time or one minute. By enabling this option it will try to next 5 minutes of joining time if internet connection is disabled.
      If you enter a value more than 5 minutes then it will try to next entered minutes (value).
    • No respond to Join request: If the extension try it self to join and if no respond to the join request. You can make more attempts by entering a value.
  14. Messages To send message in your joined meeting, you can add message text and sending time from here.

Demo(s)

Preference (Light)

Preference (Dark)

Options Page ▼

View activy log ▼
(This option track the activites what this extension did automatically and this data stores for 2 days.)

Create a new slot ▼

Slot List (Popup view) ▼

Privacy

This addon don’t collect any personal information, credentials or any sensetive information. So you can use this addon safely.

Contact

E-mail: [email protected] (for any inquiries)

Abdullah Al Naiem

Abdullah Al Naiem

Web application developer. Loves IT, Programming, and being connected with tech.

Share this article

Facebook
Twitter
LinkedIn
Pinterest
Skype
Telegram
Reddit
WhatsApp
Email
Print

Tags

Author Info

Abdullah Al Naiem

Abdullah Al Naiem

Web application developer. Loves IT, Programming, and being connected with tech.

Popular Articles

Get a Quote

Why Direct Contracts?

How it works

Direct Contracts allow you to work with freelancers on Upwork when you don’t have an Upwork account.

With escrow service, your funds are protected and won’t be released until the work has been completed. This gives your freelancer assurance that the project funds are available, and they can be certain of your payment upon the successful completion of the job. You also have the ability to cancel the contract at any point before you approve the release of funds. If you cancel, the funds are returned to your original payment method within seven business days.

All Direct Contracts will be managed by email. We’ll provide you with simple, easy-to-follow instructions every step of the way. We’ll also send you invoices with all the relevant contract details, including the contract name, description, price, your company name, and the freelancer’s name.

Freelancers with Upwork accounts can create and send both hourly and fixed-price contract proposals to their clients that aren’t registered on Upwork.

Review and accept a Direct Contract

Once a freelancer has sent you a Direct Contract offer, you’ll receive an email from Upwork detailing the freelancer’s proposal. You will receive all the key information, including the contract amount, title, and description. You will have the option to either “Accept and Fund Contract” or “Decline.”

Fund a Direct Contract

After you have agreed to the terms of the contract, you’ll be asked to deposit the funds for the contract in escrow via a credit card or PayPal. For an hourly contract, you’ll be asked for a one-time deposit for the equivalent of one week’s worth of contracted work, plus a small payment processing fee, if applicable.

Once you have deposited funds, the contract starts and your freelancer can begin the project. All transactions will take place in USD.

If you have a fixed-price contract, your freelancer may choose to add milestones to divide the job into a series of phases, due dates, or deliverables based on your needs. Milestones are individually funded, and provide a way to work through a large project in smaller steps.

If your contract has milestones, you will only need to fund one milestone at a time. For example, if the contract has five milestones at $100 for each milestone, the contract total is $500. However, you’ll only need to fund Milestone 1 with $100 (plus any payment processing fees) to get started. Once that milestone is complete, you can choose to fund and activate the next one. 

Fixed-price Contracts

Once the freelancer has completed and submitted work for the project, they will send you a request for payment. You’ll receive an email notification with the option to “Accept” or “Decline” the request.

If you accept the request, the funds are immediately released to the freelancer and the contract is closed.

If you reject the request, the funds remain in escrow and the contract is kept open, the freelancer can then make any necessary changes to the work and resubmit their payment request.

Hourly Contracts

Once the freelancer has logged hours, you will have the opportunity to review them. You’ll see what was logged in the previous week, and what is being logged in the current week. The hours will be charged automatically unless you take action.

If a freelancer logs extra hours outside of the limit on your contract, you’ll be able to approve or decline them. If you do not approve the extra hours, they will not be charged.

Note: When your freelancer submits a payment request you have 14 days to review. If you do not take action, that is considered approval and funds will be automatically released to the freelancer.

Direct Contract rights reserved by Upwork Global Inc.